Watermarks for E-commerce Images: A Batch Processing Case Study (Hundreds of Thousands of Files)
May 25, 2014 · Services: Data · Legacy Perl
This is an older but still useful case study: the task was to build a reliable pipeline for processing several hundred thousand images for online stores, including watermarks, resizing, and repeatable batch execution without manual work.
1. Business Context
The goal was not "make a nice picture in Photoshop", but a production pipeline for catalog assets:
- process large image volumes (hundreds of thousands of files),
- apply a watermark that remains readable on different backgrounds,
- perform resizing for catalog/card image sizes,
- store processed results in AWS S3,
- avoid manual GUI work and designer time for repetitive operations.
There was also a multi-store requirement: watermark assets had to be generated for different store names and then reused in an automated batch flow.
The result was a batch process that could run on large datasets and produce consistent output without human variance.
2. Finding the watermark approach (with examples)
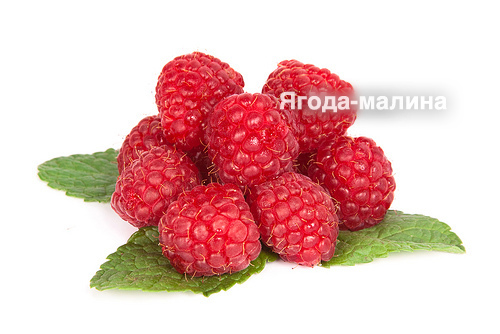
Below is the path to the final solution. The objective was practical: make the watermark visible without destroying image readability, including cases where the image already contains text.
Why a single semi-transparent caption is weak
A white semi-transparent caption disappears on light areas; a dark one disappears on dark areas. One color is not stable enough.
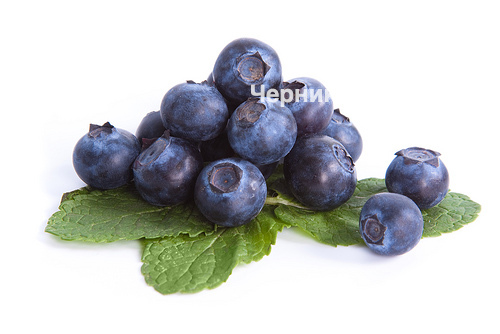
Working option: light text plus dark semi-transparent shadow
A better result came from combining a white semi-transparent caption with a dark semi-transparent shadow. This keeps the mark visible across mixed backgrounds.

If the image contains text, the watermark should not fully block it. The text + shadow transparency balance helps preserve readability.
Why one centered watermark is easy to remove
If the watermark is always the same and always placed in the center, it is comparatively easy to remove locally and replace.
Final approach: tiled watermarking across the whole image
To make removal harder, the watermark was tiled across the full image. A central element served as an anchor, and the rest were placed around it. Rotating the label made the result cleaner visually.
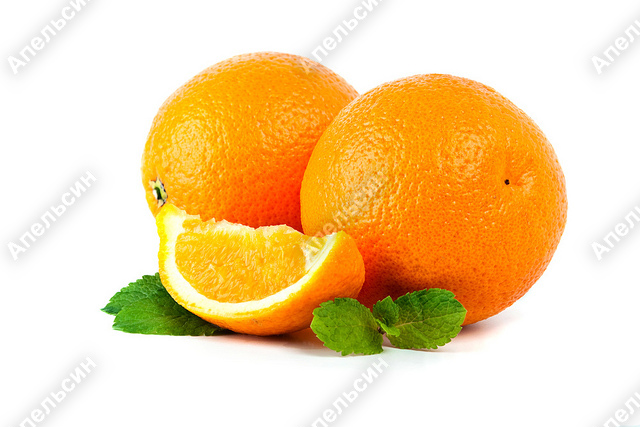
Images with berries and orange by Kirill Krasnov. Shutterstock: http://www.shutterstock.com/cat.mhtml?gallery_id=419308.
3. Technical details
This is a 2014 implementation. At that time, Cloudflare Images did not exist yet. Today, for many similar tasks, it makes sense to use an out-of-the-box managed solution (storage, transforms/resizing, delivery). This custom implementation remains here for presentation purposes: it shows how a batch image-processing pipeline was built manually.
The pipeline at the time looked like this:
- generate a PNG watermark for a specific store,
- read the source image,
- apply resizing for target catalog sizes,
- apply tiled watermarks,
- save the result and upload it to AWS S3.
3.1. Watermark generation (Perl + ImageMagick)
Below is the script that generates a PNG watermark with shadow and rotation. This asset is then used for tiling.
#!/usr/bin/perl -w

use strict;
use Image::Magick;

die `pod2text $0` unless @ARGV;

# Create a canvas with transparent background
my $image = Image::Magick->new(size=>'1000x70');
$image->ReadImage('canvas:transparent');

# Draw caption in black with 30% opacity
$image->Annotate(
	text      => $ARGV[0],
	geometry  => "+50+50",
	pen       => $image->QueryColorname('rgba(0,0,0,0.3)'),
	font      => 'Bookman-Demi',
	pointsize => 40,
	kerning   => 3,
);

# Blur it to create the shadow
$image->Blur(
	radius  => 0,
	sigma   => 6,
	channel => 'RGBA'
);

# Create a mask for the main text
my $mask = Image::Magick->new(size=>'1000x70');
$mask->ReadImage('canvas:transparent');
$mask->Annotate(
	text      => $ARGV[0],
	geometry  => "+50+50",
	pen       =>  $image->QueryColorname('rgba(255,255,255,1)'),
	font      => 'Bookman-Demi',
	pointsize => 40,
	kerning   => 3,
);

# Clear the center of the shadow under the white text
$image->Composite(
	image   => $mask,
	mask    => $mask,
	compose => 'Clear',
);

# Draw semi-transparent white text on top
$image->Annotate(
	text      => $ARGV[0],
	geometry  => "+50+50",
	pen       => $image->QueryColorname('rgba(255,255,255,0.3)'),
	font      => 'Bookman-Demi',
	pointsize => 40,
	kerning   => 3,
);

$image->Trim();

# Rotate the label
$image->Rotate(
	degrees    => -45,
	background => 'transparent',
);

# Save as PNG
if ($ARGV[1]) {
	$image->Write("$ARGV[1]");
}
else {
	$image->Write("$ARGV[0].png");
}
3.2. Applying tiled watermarks to an image
The second script computes a grid, centers it relative to the source image, and tiles the watermark across the image.
#!/usr/bin/perl -w

use strict;
use Image::Magick;
use POSIX qw/ceil/;

die `pod2text $0` unless @ARGV;

# Source image
my $image = Image::Magick->new;
$image->Read("jpg:$ARGV[0]");
my ($image_height, $image_width) = $image->Get('base-rows', 'base-columns');

# Watermark image
my $watermark = Image::Magick->new;
$watermark->Read("png:$ARGV[1]");
my ($watermark_height, $watermark_width) = $watermark->Get('base-rows', 'base-columns');

# Canvas is needed in case watermark is larger than the source image
my $canvas_height = ( $image_height > $watermark_height ? $image_height : $watermark_height );
my $canvas_width  = ( $image_width  > $watermark_width  ? $image_width  : $watermark_width  );

my $canvas = Image::Magick->new;
$canvas->Set(size => "${canvas_width}x${canvas_height}");
$canvas->Read('NULL:');

my $tiled_layer = Image::Magick->new;
$tiled_layer->Set(size => "${canvas_width}x${canvas_height}");
$tiled_layer->Read('NULL:');

# Grid size
my $tile_columns = ceil($image_width / $watermark_width);
my $tile_rows    = ceil($image_height / $watermark_height);

# Make the grid odd-sized so it has a central element
$tile_columns++ if $tile_columns % 2 == 0;
$tile_rows++    if $tile_rows % 2 == 0;

my $center_col = ceil($tile_columns / 2);
my $center_row = ceil($tile_rows / 2);
my $center_x = ($image_width - $watermark_width) * 0.5;
my $center_y = ($image_height - $watermark_height) * 0.5;

for my $col (1 .. $tile_columns) {
	for my $row (1 .. $tile_rows) {
		my $x = $center_x + ($col - $center_col) * $watermark_width;
		my $y = $center_y + ($row - $center_row) * $watermark_height;

		$tiled_layer->Composite(
			image   => $watermark,
			compose => 'over',
			x       => $x,
			y       => $y,
			gravity => 'NorthWest',
		);
	}
}

$canvas->Composite(
	image   => $image,
	compose => 'over',
	gravity => 'center',
);

$canvas->Composite(
	image   => $tiled_layer,
	compose => 'over',
);

$canvas->Crop(
	x      => ($canvas_width - $image_width) * 0.5,
	y      => ($canvas_height - $image_height) * 0.5,
	width  => $image_width,
	height => $image_height,
);

$canvas->Set(quality => 88);
$canvas->Write("jpg:$ARGV[2]");
3.3. Where resizing and S3 fit into the process
In production, these scripts were part of a larger batch pipeline: after reading the source file, the process performed resizing for required catalog formats, then applied watermarking, and finally uploaded finished versions to AWS S3. In other words, this was asset preparation as a flow, not just a single visual effect.
Simplified CLI example (for process illustration):
# 1) Generate a PNG watermark for the store
perl gen-watermark.pl "example-shop.com" /tmp/example-shop-watermark.png

# 2) Prepare resized image versions (resize was handled in the pipeline)
# 3) Apply watermark
perl watermark.pl input.jpg /tmp/example-shop-watermark.png output.jpg

# 4) Then upload the result to AWS S3

For new projects today, I would usually look at Cloudflare Images or similar managed services first. But as a case study showing custom high-volume image processing logic, this example is still useful.